Here is a video playlist of what the robot will do when you are finished. Enjoy =)
The robot is programmed to be a photovore and is therefore trapped in a 'box' of sunlight coming in through my window.
Now that you have detailed instructions easy enough for a beginner, you now have no excuses. Go make your robot! =P
Step 1 - Basics
In this part, we will talk about the motivation behind building such a robot, what you will learn in this tutorial series, what the robot will be able to do, and the parts required to be purchased.
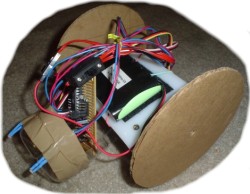
Step 2 - Mechanics
In step two, we will build the chassis of your robot. This part can mostly be done with parts around your house, and has room for creativity on your part. There are many ways to do this, I offer only one of them.
Step 3 - Electronics
The electronics steps (A, B, and C) will be the most expensive and most difficult. Few of the parts can be found around your house, and electronics itself can be difficult without a good understanding in the basics. I will do my best to guide you step by step to build your robot controller. In this step we will do all the wiring to build the brains and sensors of your robot.
Step 4 - Programming
Now that you have done the hard part, sit back and relax as programming will be simple. Better yet, this step is 100% free! Download the software, plug in your robot, upload the code to the robot controller, and away it goes!
Bonus! Rangefinder Upgrade
Upgrade your $50 Robot with a servo controlled sharp IR rangefinder.
Bonus! Microcontroller Upgrade
This quick tutorial will teach you why and how to upgrade your $50 Robot microcontroller to work faster and store larger programs.
Bonus! Line Following
I rebuilt the chassis and used a single photoresistor to do line following with the $50 Robot electronics.
Bonus! UART Tutorial Step-by-Step
This addition to the UART tutorial gives you practical step-by-step instructions on how to add UART functionality for any AVR based robot - including your $50 Robot.
Bonus! Bootloader Tutorial Step-by-Step
This addition to the bootloader tutorial (coming soon!) gives you practical step-by-step instructions on how to add bootloader functionality for any AVR based robot - including your $50 Robot.
Member Contribution: Tutorial on C++ for $50 Robot
talk about it in the forum and a method to use C++ in AVR Studio. There is also an updated library.
Member Contribution: $50 Robot Sonar Upgrade
Learn how to add sonar to your $50 Robot.
Member Contribution: Add PWM to your $50 Robot
For more info check out the forum post too.
No comments:
Post a Comment